2009年4月29日星期三

Why Make a Screencast

Screencast is a digital recording of computer screens, full screens or screen regions and usually comes with an audio narration to describe the on-screen actions. The term screencast dates back to 2004 with an interesting story.

In 2004, a columnist Jon Udell invited readers of his blog to propose names for the emerging genre. In all the suggested terms, Udell selected screencast, which was proposed by both Joseph McDonald and Deeje Cooley. His "Heavy metal umlaut" screencast is a well-known example - which explains how Wikipedia works. http://weblog.infoworld.com/udell/gems/umlaut.html
Since then, the term screen has be known by more people and the use of screencasts has itself become more popular. Currently the new trend of screencast is documentary filmmaking of software-based social networking services like Wikipedia, del.icio.us. or digg.

Screencast Types

Product Tutorials:
The screencast tells users how to use a software application or service by showing screen introductions. Usually, there is a recorded voice over to walk through the steps. See examples below.
Eventools online Demo http://www.eventtools.nl/demo/Eventtools-Toevoegen-wijzigen%20personen.html

Short How-to:
This kind of screencast is often short and demonstrates a simple guide or gives tips and tricks to solve a small problem or dig into a product feature.
See example below.
Xtrmlive Web Service Demo http://xtrmlive.com/demo/sponsorship2/

Conversational Demos:
Conversational demos have more focus on the conversion rather than the screens. Usually, there are two voices for the screen. Often one is asking question about the screen and another gives the answer.

Software review:
If you are asked to write a software review , you can always make a screencast to highlight some features.
Boq System Online Demo http://www.boq.se/help/qounter/qounter.html

User produced demo:
Some software applications are difficult to use and you sometimes have some unexpected troubles. Making a screencast to explain, will help you a lot when you are talking to the technical support. You can even make yourself a troubleshooting demo to share with your friends and families.
DMM Online Support Demo http://www.dmm-support.dk/uploads/video/4pictures/add_pictures/add_picture_to_SDB.html
Of course,there are more types has not yet included in this article.

Screencasting Tools

For Window Users
Windows Media Encoder - Free but with high system requirements http://www.videohelp.com/tools/Windows_Media_Encoder
Wondershare DemoCreator - Flash-based Screen Recorder http://www.sameshow.com/demo-creator.html#107
CamStudio - Free. It has the ability to capture in .avi or Flash (swf) http://camstudio.org/


For Mac Users
Snapz Pro X http://www.ambrosiasw.com/utilities/snapzprox/
iShowU http://www.shinywhitebox.com/

Guide Lines of making a screencast

Know what you want to present
First and foremost, You’ll need to have an idea about what you’ll present, and you’ll need to figure out which platform to use. Knowing your purposes of making a screecast is the first step.

Make it real
Always make a screencast real and substantial. For example, if it is for software demonstration or a network monitor, then work with the software or live network.
Of course , for reasons of logistics or security, this isn’t always possible. But the more real you can make it, the better.

Interactivity is important
Interactivity engages viewers through the demo. If your screecast is just screen by screen, your viewers will leave soon. You can and should record narration or insert background music to the screencast. Usually, some screencasting tools like DemoCreator enable you to add some visual aids to the captured screens like callouts, shapes, annotation buttons and animated images. Note that when a screencast is interactive it will engage the viewers in a conversation that steers it into unexpected areas.

originated from: http://www.wikihow.com/Make-a-Screencast

http://screencast-demo.blogspot.com/2009/09/maximize-your-benefit-of-your-software.html


2009年4月23日星期四

Create a DVD Photo album for party using PowerPoint


Dozens of memorable photographs come from Birthday Party, Christmas Party, Wedding Party and etc. We touched by the memories. But troubled by how to create a photo album arranging the photos in an apple-pie order, or how to share the photo album in a convenient way?

From now on, under the powerful function of widespread PowerPoint, we easily archive hundreds of our favorite high-resolution photos to create a photo album. After convert PPT to DVD, we throw ourselves in a sofa. Let memorable yesterdays flow out from the big screen TV with a remote in our hand. The bride can send DVD photo album to each of the party goers with a thank you note. The mother can memorialize your baby's first birthday permanently. Between the food, the guests, and the entertainment, a DVD photo album makes it never to end!

All these can be done in a few minutes. Just use the photo album feature of Microsoft Office PowerPoint 2007. Just four mouse clicks to burn the PPT to DVD. Let's start to create a memorable DVD Photo album.
1. On the Insert menu, click Photo Album. And in the drop-down list, click New Photo Album option.

2. Click on the 'File/Disk…' option and choose the photos. Importing multiple pictures at a time is available. You can preview each photo by clicking it in the Picture in album list. Below the preview window, there is a photo editing area. You can use these buttons to adjust the rotation, contrast and brightness of each picture.


3. In the drop-down list of Picture layout, you can choose the layout format you like. And in the drop-down list of Frame Shape, you can choose the frame you want to add to your photos. Click the Browse button. Locate the template in the Choose Theme box that allows you to navigate to the folder where we have stored the downloaded templates. Or you can use the operating system's own theme templates.


4. Clicked Create button. If necessary, click the title placeholder, and then type the title for your photos.


5. If you want to give your album captions, click the Photo Album arrow on the Insert tab. And then click Edit Photo Album. Select Captions below All pictures box, then click Update.

That's how your own PowerPoint photo album got out. Isn't this easy?

Want to store the photo album permanently? Want to share the photo album efficiently? Want to create DVD menus to play on TV with a DVD remote control?

Now, let’s convert our valuable photo album to DVD.
Click here to start the process of burning PPT to DVD.

Imagine that you and your family watch the photo album on TV after years, you all bring back the good old days. Imagine that your friends view the photo album DVD disc when you are separated by distance. So, when are you going to create your next DVD photo album? Very soon, I presume, like this happy person--“I love PPT2DVD, I created a Family Reunion album viewed on our TV's for a BBQ we had with several generations of the family. It's fantastic! Work on a bigger one for Christmas this year!”

2009年4月16日星期四

Experience of Zoom and Pan in Screen Recorder DemoCreator

Wondershare released Democreator v2.5.5 in Mar. 2009, a screen recorder on Window Platform that creates interactive presentations, tutorials and demos. This version shows the zoom and pan feature that provides specific details of a certain area on the screen, and more editing features are available. Zoom-n-pan is especially useful when the movie is replaying on a small screen. And it can also help to focus the audience’s attention on important screen operations.

Besides the zoom-n-pan feature, the developers redesign the beginning and ending of the movie. That makes the published demo more professional. The master image object introduces the new feature that you can adjust the transparence and add the redirect link in you Flash movie. You may find its good when you want to add the logo to the demo to mark it of your own, and the clickable logo can drive more traffic to your website.


The advanced editing features enable users to edit the recording readily. Because the recorded movies are shown as slides, you can drag the visual components to modify the pace and control the timing of objects. There is a library of available objects to decorate the recording, such as Flash animation, mouse movements, text box, edit entry, zoom-n-pan for specifying details of selected area, highlight boxes for spotlighting areas in a slide, and clickable buttons for directing users to another slide or a URL page. You can decorate the movie by adding the objects to make the illustration explicit. Besides, you can record the narration or import the music file to enhance the movie.

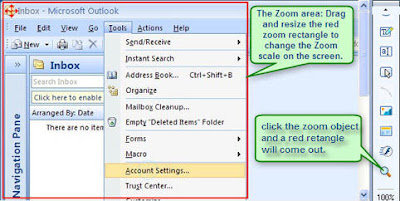
Back to the Zoom-n-Pan feature. Click the Zoom-n-Pan object in the Objects Library, then click and drag a rectangle area in the edit scene to adjust the area your want to enlarge for emphasis. When editing, the zoom area is displayed and can be easily repositioned or resized with the mouse or the property dialog box.

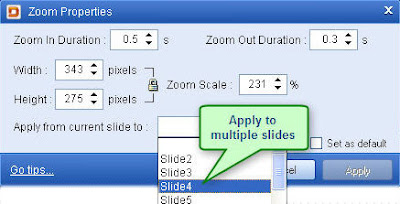
When you put the Zoom object in the movie, you can see its length in the time line. The total Zoom length includes the Zoom in duration, Zoom out duration, and the time when the zoom area playing as the enlarged status. Easily modify the Zoom in duration and Zoom out duration in the zoom property dialog box. Most slides are short for seconds, if you want to zoom in to show part of the screen for quite a while, you can set the zoom object to apply to multiple slides.

If you link up two zoom objects and preview the movie, you can see it pans smoothly from the first zoom area to the second one. That is how the panning effect achieves.

Last step is to publish your movie. There are only some publishing formats for you to choose from, but no dimension setting for the movie. It seems there is some logical error for this software. Most people don’t have the idea where to set the movie dimension, so what they do is just publishing the movie of the original size. When zooming in to enlarge an area of the movie, it comes to be a little blurring!


The truth is that you can adjust the movie dimension in the scene setting dialog box. But the Scene scale in the same box make me confused, in fact, scene scale is just related to the ratio of the editing scene but the movie dimension.

Anyway, there is the zoom-n-pan feature available in this software. In general, it is nice tool to make demos of your screen. And there are still some details and features need to be improved for better use.

2009年4月8日星期三

Make Outstanding Demo Videos with Ease


Overview of this screen recorder

Wondershare DemoCreator makes it shockingly easy to capture everything that happens on your computer screen, including audio, and create software tutorials, demos, and online instructional videos.

As a screen recording software DemoCreator is so intuitive, all it takes is 3 simple steps to produce a polished final demo: record your onscreen activities as slides, edit your recording with animated objects(optional), and publish your demo videos.


When launching this screen recorder, select to record an application window, an area of your desktop, or the entire screen. Hit record, and get stated with capturing!

Once you've finished recording, you can decorate your presentation with audio, annotations, images, Flash animation, mouse movements, highlight boxes for spotlighting areas in a slide, zoom-n-pan effect to show the specific details and clickable buttons for directing users to a different slide or URL page, thus make it a compelling demo video.

After the editing, you can go to preview or publish the recording. Your demo can be publish as Adobe Flash (SWF) files that can be integrated into HTML and displayed on a website, or you can create AVI files readily uploaded to the most popular video sharing portals. You can even create standalone executable files that are small enough to be sent via email or burned to a CD! What's more,
Wondershare DemoCreator includes comprehensive support for publishing training
courses with AICC/SCORM compliance for Moodle, WebCT, SharePoint, and Blackboard!

The result is a repeatable, consistent, and quality demonstration that your customers, trainees, or colleagues can view at their own pace, and which conveys a greater understanding of your product, service, and your point.

In General, DemoCreator provides one of the best and easy-to-use ways to record, edit, and share spectacular video demos!


Want to learn more? Check out the video:


DemoCreator lets you:


  • Capture everything that happens on your computer screen, including audio.
  • Enhance the learning impact of your presentation by adding helpful callouts, music, narration, annotations, images, interactive elements, and animations, zoom-n-pan scale.
  • Create software tutorials, demos, and online instructional videos that are repeatable and consistent.
  • Extend the reach of your training materials.
  • Output your files as Flash, AVI, or standalone executable files.
  • Publish training courses with AICC/SCORM (1.2 & 2004) compliance.

Who Needs DemoCreator?


You do if you've ever:


  • Created screencast presentations to demonstrate what online product you are selling and how it works.
  • Enhanced software training efficiency by making a series of demonstrations and video tutorials hoping that your audience will remember and retain what they've learned.
  • Reported system bugs by capturing the error window and sending it to the development team for software testing or technical support.
  • Wanted to deliver a consistent learning experience that could be re-run anytime, anywhere, at the client's own pace.