Easy to do desktop screen recording without camcorder. What you need is a piece of screen recorder software like DemoCreator. So, try to do the recording with following video.
2009年9月2日星期三
2009年8月26日星期三
Tutorial: Splitting Clips And Adding Actions In ScreenFlow
ScreenFlow is the premier screen recording software on the Mac and it
features a smooth user interface with powerful capabilities and aesthetically
pleasing effects. It has greatly simplified the tutorial process for my clients
and myself.
from the timeline, and thus, the final output of a project. This should look
familiar to anyone who has used video editing software, such as iMovie, in the
past. The written steps and tutorial video follow below.
How to Split a Clip
How to Add an Action
From: http://blog.vudat.msu.edu/?p=414&cpage=1#comment-1071
features a smooth user interface with powerful capabilities and aesthetically
pleasing effects. It has greatly simplified the tutorial process for my clients
and myself.
How To Split A Clip
The first video demonstrates how to split a video clip in order to remove itfrom the timeline, and thus, the final output of a project. This should look
familiar to anyone who has used video editing software, such as iMovie, in the
past. The written steps and tutorial video follow below.
How to Split a Clip
- Select the video segment in the timeline.
- Click and drag the playhead to the beginning of the segment that needs to be
removed.
- Go to Edit > Split Clip.
- Reposition the playhead at the end of the segment that needs to be removed.
- Repeat Step 3.
- Select the segment that has been split.
- Go to Edit > Delete.
How To Add An Action
The second video demonstrates the process behind adding an action to a clip in ScreenFlow. Video, audio, screen recording, and callout actions are all included in the software. Each has its own unique property settings that can help to give your videos an interesting, purposeful, and professional look. These individual actions are not addressed in the tutorial. Rather, the process behind adding an action is shown. Fortunately, all of ScreenFlow’s actions can be applied in the demonstrated manner. I recommend experimenting with the individual settings for each action to discover the visual effects that work best for your recordings. The written steps and tutorial video follow below.How to Add an Action
- Select a clip segment in the timeline.
- Click and drag the playhead to the location that you would like to add an
action.
- From the appropriate properties tab, click on the “Add Action” button.
Note: After an action is applied, all subsequent portions of that clip will
retain those properties, unless a new action is found.
- To end an action, repeat steps 1-3 using different property settings.
Note: Although a video action was demonstrated in this tutorial, these steps
can be followed to employ all of ScreenFlow’s actions.
From: http://blog.vudat.msu.edu/?p=414&cpage=1#comment-1071
2009年4月29日星期三
Why Make a Screencast
Screencast is a digital recording of computer screens, full screens or screen regions and usually comes with an audio narration to describe the on-screen actions. The term screencast dates back to 2004 with an interesting story.
In 2004, a columnist Jon Udell invited readers of his blog to propose names for the emerging genre. In all the suggested terms, Udell selected screencast, which was proposed by both Joseph McDonald and Deeje Cooley. His "Heavy metal umlaut" screencast is a well-known example - which explains how Wikipedia works. http://weblog.infoworld.com/udell/gems/umlaut.html
Since then, the term screen has be known by more people and the use of screencasts has itself become more popular. Currently the new trend of screencast is documentary filmmaking of software-based social networking services like Wikipedia, del.icio.us. or digg.
Screencast Types
Product Tutorials:
The screencast tells users how to use a software application or service by showing screen introductions. Usually, there is a recorded voice over to walk through the steps. See examples below.
Eventools online Demo http://www.eventtools.nl/demo/Eventtools-Toevoegen-wijzigen%20personen.html
Short How-to:
This kind of screencast is often short and demonstrates a simple guide or gives tips and tricks to solve a small problem or dig into a product feature.
See example below.
Xtrmlive Web Service Demo http://xtrmlive.com/demo/sponsorship2/
Conversational Demos:
Conversational demos have more focus on the conversion rather than the screens. Usually, there are two voices for the screen. Often one is asking question about the screen and another gives the answer.
Software review:
If you are asked to write a software review , you can always make a screencast to highlight some features.
Boq System Online Demo http://www.boq.se/help/qounter/qounter.html
User produced demo:
Some software applications are difficult to use and you sometimes have some unexpected troubles. Making a screencast to explain, will help you a lot when you are talking to the technical support. You can even make yourself a troubleshooting demo to share with your friends and families.
DMM Online Support Demo http://www.dmm-support.dk/uploads/video/4pictures/add_pictures/add_picture_to_SDB.html
Of course,there are more types has not yet included in this article.
Screencasting Tools
For Window Users
Windows Media Encoder - Free but with high system requirements http://www.videohelp.com/tools/Windows_Media_Encoder
Wondershare DemoCreator - Flash-based Screen Recorder http://www.sameshow.com/demo-creator.html#107
CamStudio - Free. It has the ability to capture in .avi or Flash (swf) http://camstudio.org/
For Mac Users
Snapz Pro X http://www.ambrosiasw.com/utilities/snapzprox/
iShowU http://www.shinywhitebox.com/
Guide Lines of making a screencast
Know what you want to present
First and foremost, You’ll need to have an idea about what you’ll present, and you’ll need to figure out which platform to use. Knowing your purposes of making a screecast is the first step.
Make it real
Always make a screencast real and substantial. For example, if it is for software demonstration or a network monitor, then work with the software or live network.
Of course , for reasons of logistics or security, this isn’t always possible. But the more real you can make it, the better.
Interactivity is important
Interactivity engages viewers through the demo. If your screecast is just screen by screen, your viewers will leave soon. You can and should record narration or insert background music to the screencast. Usually, some screencasting tools like DemoCreator enable you to add some visual aids to the captured screens like callouts, shapes, annotation buttons and animated images. Note that when a screencast is interactive it will engage the viewers in a conversation that steers it into unexpected areas.
originated from: http://www.wikihow.com/Make-a-Screencast
http://screencast-demo.blogspot.com/2009/09/maximize-your-benefit-of-your-software.html
2009年4月23日星期四
Create a DVD Photo album for party using PowerPoint
Dozens of memorable photographs come from Birthday Party, Christmas Party, Wedding Party and etc. We touched by the memories. But troubled by how to create a photo album arranging the photos in an apple-pie order, or how to share the photo album in a convenient way?
From now on, under the powerful function of widespread PowerPoint, we easily archive hundreds of our favorite high-resolution photos to create a photo album. After convert PPT to DVD, we throw ourselves in a sofa. Let memorable yesterdays flow out from the big screen TV with a remote in our hand. The bride can send DVD photo album to each of the party goers with a thank you note. The mother can memorialize your baby's first birthday permanently. Between the food, the guests, and the entertainment, a DVD photo album makes it never to end!
All these can be done in a few minutes. Just use the photo album feature of Microsoft Office PowerPoint 2007. Just four mouse clicks to burn the PPT to DVD. Let's start to create a memorable DVD Photo album.
1. On the Insert menu, click Photo Album. And in the drop-down list, click New Photo Album option.

2. Click on the 'File/Disk…' option and choose the photos. Importing multiple pictures at a time is available. You can preview each photo by clicking it in the Picture in album list. Below the preview window, there is a photo editing area. You can use these buttons to adjust the rotation, contrast and brightness of each picture.

3. In the drop-down list of Picture layout, you can choose the layout format you like. And in the drop-down list of Frame Shape, you can choose the frame you want to add to your photos. Click the Browse button. Locate the template in the Choose Theme box that allows you to navigate to the folder where we have stored the downloaded templates. Or you can use the operating system's own theme templates.


4. Clicked Create button. If necessary, click the title placeholder, and then type the title for your photos.

5. If you want to give your album captions, click the Photo Album arrow on the Insert tab. And then click Edit Photo Album. Select Captions below All pictures box, then click Update.

That's how your own PowerPoint photo album got out. Isn't this easy?
Want to store the photo album permanently? Want to share the photo album efficiently? Want to create DVD menus to play on TV with a DVD remote control?
Now, let’s convert our valuable photo album to DVD.
Click here to start the process of burning PPT to DVD.
Imagine that you and your family watch the photo album on TV after years, you all bring back the good old days. Imagine that your friends view the photo album DVD disc when you are separated by distance. So, when are you going to create your next DVD photo album? Very soon, I presume, like this happy person--“I love PPT2DVD, I created a Family Reunion album viewed on our TV's for a BBQ we had with several generations of the family. It's fantastic! Work on a bigger one for Christmas this year!”
2009年4月16日星期四
Experience of Zoom and Pan in Screen Recorder DemoCreator
Wondershare released Democreator v2.5.5 in Mar. 2009, a screen recorder on Window Platform that creates interactive presentations, tutorials and demos. This version shows the zoom and pan feature that provides specific details of a certain area on the screen, and more editing features are available. Zoom-n-pan is especially useful when the movie is replaying on a small screen. And it can also help to focus the audience’s attention on important screen operations.
Besides the zoom-n-pan feature, the developers redesign the beginning and ending of the movie. That makes the published demo more professional. The master image object introduces the new feature that you can adjust the transparence and add the redirect link in you Flash movie. You may find its good when you want to add the logo to the demo to mark it of your own, and the clickable logo can drive more traffic to your website.
The advanced editing features enable users to edit the recording readily. Because the recorded movies are shown as slides, you can drag the visual components to modify the pace and control the timing of objects. There is a library of available objects to decorate the recording, such as Flash animation, mouse movements, text box, edit entry, zoom-n-pan for specifying details of selected area, highlight boxes for spotlighting areas in a slide, and clickable buttons for directing users to another slide or a URL page. You can decorate the movie by adding the objects to make the illustration explicit. Besides, you can record the narration or import the music file to enhance the movie.
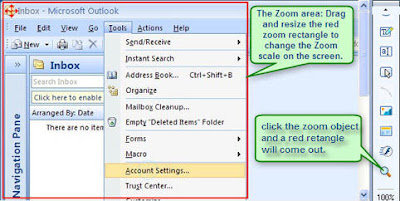 Back to the Zoom-n-Pan feature. Click the Zoom-n-Pan object in the Objects Library, then click and drag a rectangle area in the edit scene to adjust the area your want to enlarge for emphasis. When editing, the zoom area is displayed and can be easily repositioned or resized with the mouse or the property dialog box.
When you put the Zoom object in the movie, you can see its length in the time line. The total Zoom length includes the Zoom in duration, Zoom out duration, and the time when the zoom area playing as the enlarged status. Easily modify the Zoom in duration and Zoom out duration in the zoom property dialog box. Most slides are short for seconds, if you want to zoom in to show part of the screen for quite a while, you can set the zoom object to apply to multiple slides.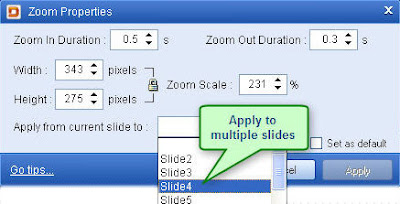
If you link up two zoom objects and preview the movie, you can see it pans smoothly from the first zoom area to the second one. That is how the panning effect achieves.
Last step is to publish your movie. There are only some publishing formats for you to choose from, but no dimension setting for the movie. It seems there is some logical error for this software. Most people don’t have the idea where to set the movie dimension, so what they do is just publishing the movie of the original size. When zooming in to enlarge an area of the movie, it comes to be a little blurring!

The truth is that you can adjust the movie dimension in the scene setting dialog box. But the Scene scale in the same box make me confused, in fact, scene scale is just related to the ratio of the editing scene but the movie dimension.
Anyway, there is the zoom-n-pan feature available in this software. In general, it is nice tool to make demos of your screen. And there are still some details and features need to be improved for better use.
Besides the zoom-n-pan feature, the developers redesign the beginning and ending of the movie. That makes the published demo more professional. The master image object introduces the new feature that you can adjust the transparence and add the redirect link in you Flash movie. You may find its good when you want to add the logo to the demo to mark it of your own, and the clickable logo can drive more traffic to your website.
The advanced editing features enable users to edit the recording readily. Because the recorded movies are shown as slides, you can drag the visual components to modify the pace and control the timing of objects. There is a library of available objects to decorate the recording, such as Flash animation, mouse movements, text box, edit entry, zoom-n-pan for specifying details of selected area, highlight boxes for spotlighting areas in a slide, and clickable buttons for directing users to another slide or a URL page. You can decorate the movie by adding the objects to make the illustration explicit. Besides, you can record the narration or import the music file to enhance the movie.
 Back to the Zoom-n-Pan feature. Click the Zoom-n-Pan object in the Objects Library, then click and drag a rectangle area in the edit scene to adjust the area your want to enlarge for emphasis. When editing, the zoom area is displayed and can be easily repositioned or resized with the mouse or the property dialog box.
When you put the Zoom object in the movie, you can see its length in the time line. The total Zoom length includes the Zoom in duration, Zoom out duration, and the time when the zoom area playing as the enlarged status. Easily modify the Zoom in duration and Zoom out duration in the zoom property dialog box. Most slides are short for seconds, if you want to zoom in to show part of the screen for quite a while, you can set the zoom object to apply to multiple slides.

If you link up two zoom objects and preview the movie, you can see it pans smoothly from the first zoom area to the second one. That is how the panning effect achieves.
Last step is to publish your movie. There are only some publishing formats for you to choose from, but no dimension setting for the movie. It seems there is some logical error for this software. Most people don’t have the idea where to set the movie dimension, so what they do is just publishing the movie of the original size. When zooming in to enlarge an area of the movie, it comes to be a little blurring!

The truth is that you can adjust the movie dimension in the scene setting dialog box. But the Scene scale in the same box make me confused, in fact, scene scale is just related to the ratio of the editing scene but the movie dimension.
Anyway, there is the zoom-n-pan feature available in this software. In general, it is nice tool to make demos of your screen. And there are still some details and features need to be improved for better use.
2009年4月8日星期三
Make Outstanding Demo Videos with Ease
Overview of this screen recorder
Wondershare DemoCreator makes it shockingly easy to capture everything that happens on your computer screen, including audio, and create software tutorials, demos, and online instructional videos.
As a screen recording software DemoCreator is so intuitive, all it takes is 3 simple steps to produce a polished final demo: record your onscreen activities as slides, edit your recording with animated objects(optional), and publish your demo videos.
When launching this screen recorder, select to record an application window, an area of your desktop, or the entire screen. Hit record, and get stated with capturing!
Once you've finished recording, you can decorate your presentation with audio, annotations, images, Flash animation, mouse movements, highlight boxes for spotlighting areas in a slide, zoom-n-pan effect to show the specific details and clickable buttons for directing users to a different slide or URL page, thus make it a compelling demo video.
After the editing, you can go to preview or publish the recording. Your demo can be publish as Adobe Flash (SWF) files that can be integrated into HTML and displayed on a website, or you can create AVI files readily uploaded to the most popular video sharing portals. You can even create standalone executable files that are small enough to be sent via email or burned to a CD! What's more,
Wondershare DemoCreator includes comprehensive support for publishing training
courses with AICC/SCORM compliance for Moodle, WebCT, SharePoint, and Blackboard!
The result is a repeatable, consistent, and quality demonstration that your customers, trainees, or colleagues can view at their own pace, and which conveys a greater understanding of your product, service, and your point.
In General, DemoCreator provides one of the best and easy-to-use ways to record, edit, and share spectacular video demos!
Want to learn more? Check out the video:
DemoCreator lets you:
- Capture everything that happens on your computer screen, including audio.
- Enhance the learning impact of your presentation by adding helpful callouts, music, narration, annotations, images, interactive elements, and animations, zoom-n-pan scale.
- Create software tutorials, demos, and online instructional videos that are repeatable and consistent.
- Extend the reach of your training materials.
- Output your files as Flash, AVI, or standalone executable files.
- Publish training courses with AICC/SCORM (1.2 & 2004) compliance.
Who Needs DemoCreator?
You do if you've ever:
- Created screencast presentations to demonstrate what online product you are selling and how it works.
- Enhanced software training efficiency by making a series of demonstrations and video tutorials hoping that your audience will remember and retain what they've learned.
- Reported system bugs by capturing the error window and sending it to the development team for software testing or technical support.
- Wanted to deliver a consistent learning experience that could be re-run anytime, anywhere, at the client's own pace.
2009年3月24日星期二
Step-by-step Guide Video - Tech Support Solution
As a technical support staff, a question that I am asked a lot by my customers is "Can you show me the solution of the problem step by step?" I try really hard to state the operating steps to them by the words in the email or on the phone, but they don’t get what I mean for most of times. In fact, the 80% questions have been asking again and again, but I still have to answer them one by one. Now the solution is clear for me: Creating the step-by-step video for troubleshooting.

Why create a video for technical support?
- It is an easy way to explain your solution process
- No continual stop/start grabbing screenshots and typing instructions
- Easy to follow along and reproduce steps
- Friendly to users
- Reduce service costs with online customer self-service
To make a troubleshooting video, there are 4 steps to go: prepare your script, record screen activities, edit your recording, and publish your movie. There are some applications available to record what happens on your computer. A few of them are free, but with little editing feature. Some editing is necessary for making a compelling step-by-step video. Here I will focus on the editing feature of DemoCreator.
The advanced editing features enable you to edit the recording and add details to your video. Because the recorded movies are shown as a slide format in this screencasting tool, you can readily modify the pace and control the timing of objects such as visual components on the timeline editor for each slide. There is a library of available objects to decorate the recording, such as Flash animation, mouse movements, text box, edit entry, zoom-n-pan scale for specifying specific details for selected area, highlight boxes for spotlighting areas in a slide, and clickable buttons for directing users to a different slide or URL page. You can enhance the video by adding the objects to make the illustration explicit. Besides, you can rerecord the narration or import the music file to the video if it is in need. Furthermore, the existed project can be imported to the current recording project. It means that this screen recorder supports project reuse, and the multiple videos can be integrated as one.
To make a good step-by-step video, there are some useful tips:
- Prepare your recording script: Be familiar with the software you are going to demonstrate, and know clearly of the operating steps. If you want to add the narration to the video, you’d better write down the script or prepare it in your mind.
- Capture only the minimum screen area that you need. This will reduce the file size. And you can emphasize the important part by zooming and panning.
- Adjust the screen resolution and color quality: To improve your computer’s performance during the screen-capture session, especially if you plan to capture the entire computer screen, reducing the screen resolution and color quality is good for the recording performance.
- Be aware of your mouse movements: When selected the Taking screenshots recording mode, avoid the unnecessary clicks; when selected the Full motion recording, you may hang the mouse to the area which need to be selected or clicked for a second or two. For a video with audio, the synchronization is very important.
- It's OK to pause. If there is a long video or if you have to pause when in recording, it is all right. And you can resume your recording by capturing additional slides.
- Save your recording in the shareable format. To put the video on your websites, publish the output as Flash movie with Html page is nice. To share it on video sharing website like Youtube, you can publish it as Avi.
Well, have a try and make the video of screen for technical stuff. You may enjoy doing that.
2009年3月18日星期三
2009年3月11日星期三
Top 7 Screen Recorders with Zoom-n-Pan: Show Specific Details
Zoom-n-Pan is very useful when making videos for the small screen. This feature allows you to zoom and pan in a specific area smoothly showing specific area in details, and focus your audience’s attention on important screen movements or actions to make your point clearly. Now more and more screen recorders come to introduce this feature that provides full visual clarity when replaying on a smaller screen. Here I have collected 7 screen recorders with the zoom-n-pan feature, you may pick up the one that fits your need.
1. DemoCreator 
Easily creates the powerful animated software video tutorials and website demos just by three steps: Record, Edit, and Publish. The new version of DemoCreator 2.5.5 has enhance the user’s experience and the editing features.
Put the zoom object on the area of the slides you want to enlarge for emphasis. When editing, the zoom area is displayed and can be easily repositioned or resized with the mouse. If you link up two zoom objects, you can see the panning effect.
2. Captivate ![]()
Captivate from Adobe lets you create powerful and engaging Flash-based simulations, software demonstrations, and scenario-based training without programming knowledge or multimedia skills. Captivate 4 has just been released.
To achieve the zoom-n-pan effect in Captivate, you need to put a zoom object to select the area. It works like a magnifying glass on your screen.
3. Camtasia 
Easily record onscreen activity. Edit for professional polish, enhance for emphasis. Share multiple video formats conveniently. Version 6.0 features support for HD, timesaving editing hotkeys, and the ability to edit audio and video tracks independently.
Add the zoom-n-pan effect to the selected key frames, and adjust the zoom speed and scale for best result.
4. BB FlashBack
Easy-to-use screen recorder creates compact, high quality movies for tutorials, demos and presentations with powerful video and audio editing features. Version 2.5 includes and enhances multiple formats export.
You can emphasize key actions and areas of the screen by adding 'pan' and 'zoom' effects to your presentation for that professional finish.
5. Instant Demo
Using a very simple interface you can create animated Flash demos quickly and easily. Most controls to edit and annotate are contained in just one sm
Zooming is done during editing by dragging a rectangle around the region to be enlarged. The zoom region can automatically follow the mouse activity.
6. DemoBuilder
A powerful Flash-based tool that allows you to create eye-catching and professionally-looking interactive presentations that do not require any programming skills.
Set the zoom scale and time for the key frames. Adjust the parameter by dragging the parameter to left or right. You may find setting your zoom target area confusing if you are not familiar with this screen recorder.
7. TipCam![]()
Free screen recorder for Windows. Record your screen and voice in a flash video (FLV format) and share it instantly at uTIPu.com or via e-mail.
The only free application supports Pan-n-Zoom so the recording area can easily follow the movements of your mouse cursor. The Pan-n-Zoom feature is controlled by some hot key when recording. Not that convenient for users.
2009年2月24日星期二
Can Moodle Do A Good Job In Importing PowerPoint
Originated from http://www.sameshow.com/blog/2009/02/20/can-moodle-do-a-good-job-in-importing-powerpoint.html
Discussions from Moodle
Jean-Marc Leblond said:I need some help, I am trying to import a Power Point into my lesson and I keep on getting the following error code:"PCLZIP_ERR_BAD_FORMAT (-10): Unable to find End of Central Dir Record signature". Can any one give me any direction?
James Chan said:I have installed Moodle 1.7 on my test server. I placed the SQL outside the public directory. Today, when I tried to import a PowerPoint into a lesson, it just gave me an error message "could not get data".
The two questions are only the tip of the iceberg about importing PowerPoint to Moodle. You can hear such and such discussions every day on Moolde.org. Can Moodle do a good job in importing PowerPoint courses? Maybe not.

There are many limitations about importing PowerPoint to Moodle
Discussions from Moodle
Jean-Marc Leblond said:I need some help, I am trying to import a Power Point into my lesson and I keep on getting the following error code:"PCLZIP_ERR_BAD_FORMAT (-10): Unable to find End of Central Dir Record signature". Can any one give me any direction?
James Chan said:I have installed Moodle 1.7 on my test server. I placed the SQL outside the public directory. Today, when I tried to import a PowerPoint into a lesson, it just gave me an error message "could not get data".
The two questions are only the tip of the iceberg about importing PowerPoint to Moodle. You can hear such and such discussions every day on Moolde.org. Can Moodle do a good job in importing PowerPoint courses? Maybe not.
There are many limitations about importing PowerPoint to Moodle
Complicated presentations with animations, transitions and graphic effects can not be imported
This feature does not work with PowerPoint 2003 and onward
Multimedia presentation with audios, videos and Flash movies cannot be imported normally
That is to say, you should keep your PowePoint course as simple as possible, and text only is the best. No image, no bullet, no audio, no animation and no...? However, such courses are none other than fatal points for effective course to catch the learners to performance.
Here is the way: Convert PowerPoint to SCORM compliant Flash courses
Why Flash?
- Seamless conversion. You multimedia PowerPoint course could be converted to Flash seamlessly, then the Flash course could be shown in Moodle as it is supposed to be.
Smaller file size. Flash files are highly compressed and therefore, the preferred streaming media for the internet, or for quick files distribution. Presentations, when converted to Flash will become very portable and can be easily shared on Moodle, and also do not take up much space.
Streaming technology. This enables you to play a movie file without waiting for the whole file to download. As the preferred streaming media, Flash can enhance your reach when you need to do big or lengthy presentations.
Playback control. Flash offers more flexible playback controls like stop, pause, replay and etc.
Why SCORM compliant?
Once your PowerPoint is converted to SCORM 2004 or compliant Flash SCORM 1.2 compliant Flash, your course becomes "track-able", meaning, you can track the presentation in your Moodle. Progress tracking features like, accessed time, number of viewed slides, presentation time and whether or not the presentation was completed by the user - are all available to you. It is ideal for instructional designers to focus on creating better e-learning content, in effect creating a force multiplier for e-learning effectiveness.
In summary, PowerPoint to Flash converter that allows you to "boost" your PowerPoint course presentations into and interactive and engaging, multimedia experience for your learners. The SCORM compliant feature will let your presentation be track-able.
Which tool to create Flash compliant course from PowerPoint?
There are several tools that can export Powerpoints or other presentations as SCORM compliant Flash movies, you could go to http://docs.moodle.org/en/Tools_for_creating_SCORM_content to get more. Take Wondershare PPT2Flash Professional for example, this tool can help you convert PowerPoint course to SCORM compliant Flash for high-impact Web presentations and eLearning Courses with rich media, quizzes and simulations. You could view the details about how to convert PowerPoint course to Flash and upload to Moodle at:
http://www.sameshow.com/powerpoint-to-flash/howto3.html#110
Get Exposure - Increase Your Business Sales
No doubt about that, the one thing that any company, corporation or business wants is exposure. Exposure shapes and molds a company or an idea to formulate a process in the potential customer’s mind. If you can get them to think it, perhaps you can get them to buy it. In other words, more exposure, more money. But how to get more exposure and make it work? A convictive demonstration of your product and service can be good.
Advertising on TV is a good way to get exposure. But the budget is not affordable for everyone. When the internet became available for business and consumer consumption, now the truth is that: no matter what the size of a company is, they can create visibility for themselves, especially online. Online demonstration can be more effective to spread your business and increase your business sales. A stunning demo is helpful to show the features and functions of your product and service. And it could be a way to attracting more people to learning about your business. Statistics shows that offering your potential customers a product or service they can actually see will help create a massive increase in your sales.
Here is a story from Marketing Your Business on YouTube.
Charles Smith, a pottery artist from Mobile, Ala., thinks about the tens of thousands of people worldwide who have clicked on his videos to watch him create works of art on his pottery wheel only to break them up at the end.
“You’ve got to have a gimmick, so I broke up the pots,” says Smith, who says about 90 percent of that traffic is students, but 10 percent is actually generating sales.
To make a compelling demonstration video, you don’t have to find a professional advertising company. There are plenty convenient devices for you to get it done, what you need is creativity.
Camcorders come to be prevalent in making personalized videos. If you don’t feel comfortable to speak in front of the machine, creating a PowerPoint presentation can be the way of your demonstration, but it is not the right format to share online. Converting the PowerPoint presentation file into a Flash movie or a video for wide distribution sounds flexible. For that, PPT2Flash Pro or PPT2Video is available. Another Screencasting tool like DemoCreator provides a highly effective way to guide people through a complicated operating task: it records the onscreen activity to generate the step by step videos for software and website system demonstration.
The video demonstration can better illustrate your business than text with pictures, not matter products or service, in an unconventional way. When the information of your business can be delivered clearly to people, they will respond very well. The video demonstration enhances their experience. They feel a connection because they can visually see and hear how the products and service work. This will help them to make the purchase decision.
The predominately used publishing media for online demonstration are Flash movie and video. This makes it easy to share on product websites, podcast websites, blogs, social sites and more. As far as you know, YouTube, Blogspot and Myspace are all popular all over the world. So, you are getting mass exposure advertising to reach out to the masses. And it may transform them to your future customers.
More benefit you can get from the step by step online demonstration videos…
The demonstration video reduces service costs with online customer self-service. It could be the solution when users meet the trouble using your service and products. If they can find the related solution demos on your websites, users can get the problems done by themselves most of times.
When you want to drive more traffic to your website, you can put your company logo with the site link in the movie. This will remind them to go immediately to your website for additional information. For example, you are making a video demonstrating a software product. You can add the URL at the downright corner of the Flash movie to direct the viewers to your product page and they may immediately buy.
What can you or your company do to create more visibility and exposure for your service or product? What creative ways can you find to share what you want to share?
2009年2月16日星期一
Screencasts - Effective Technology Training in Enterprises
We had the rapid technology development of new mobile devices and platforms, virtualization, cloud computing, and more. But we also met the serious financial crisis in 2008. In enterprises, more and more people are upgrading their OA systems and products with new technologies. Nowadays high quality and low cost training of new technology is what enterprises looking
for.
When an enterprise is going to adopt the new software product or a new system to provide them higher productivity and greater functionality, training is the must-have item before the technology is widely used. The traditional way of sending your employees or users to a training center costs a mass of money and time, and it means that you lose productivity from your
employees. And the truth shows that, usually they don’t learn much in the training classes. When they start to use the new software application, they meet difficulties everywhere.
In this recession period, the inexpensive solutions which can achieve the effective result are the choices for most enterprises. As e-learning and knowledge management come to be popular in enterprise training, the task-oriented screencast presentation is a good solution for technology training in enterprise.
A screencast is a digital recording of computer screen output, also known as a video screen capture, often containing audio narration. It is a powerful tool to demonstrate technical tasks, or to illustrate technical concepts that are hard to explain in words with screen recording and slideshows.

There are two ways to do the training screencast: have someone done it or do it yourself with screencasting tool. There are some professional companies like AotoDemo that makes software demo and website demo for enterprise, but the cost is beyond some enterprises’ budget in this difficult time. To make it yourself, there are many software applications available to produce screencasts. What software you need depends on your computer platform and the content you want to make. The screencasting tool I suggest is DemoCreator for Windows. Some free solutions such as TipCam or Camstudio can also be your option. The main downside is that the free applications are almost with no editing features.
To make a screencast with DemoCreator, you have 4 steps to go: prepare your script, record screen activities, edit your recording, and publish your movie. Here we will take a look at some special features of DemoCreator:
Record the onscreen activity as slides for easy editing
DemoCreator record video tutorials with audio by screen capture, and show exactly how the application (such as PowerPoint, Photoshop and website) or system runs. The screen recording is saved as slides. This enables users to save the desired slides and discard the unwanted slides for their presentation.
Edit the recording tutorial with interactive objects for explicit illustration
There is a library of objects to decorate the recording, such as Flash animation, highlight boxes, and clickable buttons for directing users to another slide or a URL page. Users can enhance thepresentation by adding the objects to make the illustration explicit. And it allows users to rerecord the narration or import the audio for the training content. Furthermore, multiple tutorial projects can be integrated as one.

Publish the presentation for online training
To make interactive training presentations, the predominately used publishing output media type in DemoCreator is Flash movie and Html. Trainers can provide the video tutorials compliant with SCORM or AICC. The screencasts are available through both commercial and open source learning management systems for school education and enterprise training.
The screencast training is clearer and more engaging than traditional teaching; the training tutorials can be played as many times as needed; the tutorial videos are for "anytime/anywhere" learning… These advantages make screencast an outstanding training method, especially in this tough economic time. For enterprise, the training content can be put on the Knowledge Management System like SharePoint or Learning Management System like Moodle for knowledge sharing and technology training. Then the trainees and employees can learn the technology on Internet freely.
Related Links :
Get start with DemoCreator
2009年2月3日星期二
How to Extract the Zip File in Windows
This sample is created by Wondershare DemoCreator.
It is easy to upzip a zip file if you have Win RAR software installed in your system. But without Win RAR, how to open a zip file in Windows. This demo shows that how to extract the Zip file step by step:
- Right click on the file and select "extract all". This will open the extraction wizard.
- Click "next" and then select the location to extract the files to.
- Then click "ok".
- Click "next" and the extraction process should begin.
- Make sure that the "Show Extracted Files" option is checked.
- When complete, hit "Finish" to view the extracted file.
2009年1月21日星期三
DemoCreator - Screen Recorder for Learning
Screen recorder is the software for recording screen activity and mouse movement to create movies and interactive demos. It is useful for creating training materials, software tutorials, presentations, and product demonstrations. As a powerful presentation tool, nowadays screen recorder is widely used in teaching and learning.
The research about screen recording suggests that screen recordings increase teaching presence and thus improve students' learning experiences.
- For teachers, they can perform demos in an online learning environment; the tutorials can be edited with multiple interactive elements before delivery, the demos support reuse...
- For students, the presentations created by screen recorder is clearer and more engaging than written instructions or static screen shots; the demos can be played as many times as needed; the tutorial videos is for "anytime/anywhere" learning...
Using screen recorder to create presentations for online teaching becomes more and more popular in edu 2.0. DemoCreator - is widely used in universities and institutions, DemoCreator is a nice screen recorder for creating electronic learning presentations. It provides friendly interfaces and powerful editing features. No need of multimedia and programming skills to make interactive tutorials. We will take a look at this screen recorder in details.
Record the onscreen activity as slides
DemoCreator record video tutorials with audio by screen capture, and show exactly how the application (such as PowerPoint, Photoshop and website) or system runs. The screen recording is saved as slides. The slide format makes it easy to edit. For example, the mouse curse is recorded as an editable object in the timeline of a slide, users can change its clicking area, clicking effect, movement route and time. A mass of slides for a lengthy presentation could be a disadvantage for some users, but this enables users to save the desired slides and discard the unwanted slides for their presentation.
Edit the recording tutorial with interactive objects
Because tutorials and simulations are shown as a slide format in DemoCreator, users can readily modify the pace and control the timing of objects such as visual components on the timeline editor for each slide. There is a library of available objects to decorate the recording, such as Flash animation, mouse movements, text box, edit entry, highlight boxes for spotlighting areas in a slide, and clickable buttons for directing users to a different slide or URL page. Users can enhance the presentation by adding the objects to make the illustration explicit. Users can rerecord the narrations for the tutorials, or they can import the music files to their tutorials. Furthermore, the existed project can be imported to the current presentation project. It means that DemoCreator supports tutorial reuse, and the multiple tutorials can be integrated as one.
Publish the presentation for online learning
To make interactive presentations, the predominately used publishing output media type in DemoCreator is Flash movie. The main drawback is that lengthy presentations can result in a large number of slides that can be time consuming to publish and result in a larger file size. And DemoCreator enables teachers to provide students with record results through Sharable Content Object Reference Model (SCORM) or Aviation Industry Computer-based Training Committee (AICC). SCORM and AICC courseware are available through both commercial and open source learning management systems for school education and enterprise training.
"Teaching is a performing art."
— Bob Ross, professional speaker and humorist
Easy to make your presentation with screen recorder. But remember, to make a good presentation, instructor enthusiasm and creativity are the key.
Related Links :
Get start with DemoCreator
2009年1月19日星期一
Top E-Learning Tools of 2009
Nowadays, many predictions come forth from every industry. 9 E-Commerce Predictions for 2009, 10 tech predictions for 2009, eLearning predictions for 2009 and so on. Though we know none of us can see into the future, we cannot deny that these predictions play significant roles in guidance for our future work. Below I list some eLearning tools I gather up for 2009, hope these could give you some help in your future teaching and learning. I will classify these tools into 6 different types. Most of them are Free.

Presentation Tools
Zoho Show is an FREE online presentation program allows users to create presentations from scratch or (as is often the case) import from their library of Microsoft PowerPoint (.ppt, .pps) or OpenOffice (.odp, .sxi) presentations.
280 Slides is a notable Free online replacement for desktop presentation apps.With it, you can create a presentation, theme it, add graphics and video, and then present it, share it
via Slideshare, or download it as a PowerPoint or PDF file.
PowerPoint is a versatile presentation tool. It is ideal for creating professional presentations
that integrate text, charts, diagrams and clip art images.
Wondershare
PPT2Flash lets non-technical users create high-impact Flash presentations and eLearning courses from PowerPoint with rich media, quizzes and simulations. PPT2Flash content runs on any Web server, any LMS. For organizations with Learning Management Systems, PPT2Flash creates SCORM and AICC-compliant content so learner results can be tracked.
Simulation Tools
ScreenToaster is a Free online screen recorder paired with a video platform dedicated to screencasts. Just the perfect tool to search and find tutorials, howtos, reviews, tips and tricks,
showcases, walkthrough and e-learning formations.
CamStudio is able to record all screen and audio activity on your computer and create industry-standard AVI video files and using its built-in SWF Producer can turn those AVIs into lean, mean, bandwidth-friendly Streaming Flash videos (SWFs).
DemoCreator is a professional screen recording tool to create better-than-live software video
tutorials, presentations and training courses.
Adobe Captive is an electronic learning tool for Microsoft Windows which can be used to author
software demonstrations, software simulations, branched scenarios, and randomized quizzes in .swf format.
Assessment Tool
Hot Potatoes provides a suite of tools that enable you to create interactive web-based activities for self-assessment purposes. It is free of charge for publicly funded, non-profit, educational
users.
Qedoc Quiz Maker is a FREE teaching tool for making interactive lessons & quizzes and test preparation.
Online QuizCreator is a powerful assessment tool that you can create Flash online exam, quiz, test and survey. It combines interactivity and multimedia to engage learners through the
learning process and offers flexible results tracking and score reporting.
Articulate QuizMaker is a commercial tool that generates web-based quizzes and surveys.
Virtual Classroom
WiZiQ offers free online e-teaching and
e-learning using web conferencing with document and whiteboard sharing, teacher
resumes and presentation sharing.
Adobe Acrobat
Connect Pro is the complete Web communications solution that enables live
online meetings, virtual classes, and group collaboration.
Course Management System
Moodle is a simple and quick way to get a blog up and running. You can use it for your own professional diary, to run a blog for your course or for your students to keep their own learning journals.
Blogging Tools
Blogger is a simple and quick way to get a blog up and running. You can use it for your own professional diary, to run a blog for your course or for your students to keep their own learning journals.
Edublogs is “the largest education community on the Internet” where you can sign up for a free WordPress-powered blog.
2009年1月10日星期六
Will Google Chrome Win the Browser War in 2009? - High Quality Google Chrome Guide Video
There are a lot of reviews of 2008 and predictions for 2009 when we step in the New Year. That Google released its own browser Google Chrome ranks in the top 10 software news in 2008, and some experts predicts that Google Chrome will take up a market share of 10%~15% in 2009. Google Chrome is great, but it is not easy to change old routines and make users switch from their current browsers. This prediction will come true or not? We will keep an eye on it.
Google Chrome is a wonderful browser with a simple and clean user interface. It is quite different form IE 8 and FireFox 3. Based on the features of Google Chrome, can it win the browser war in 2009? We will review the special features of Google Chrome. And I have made a demo with DemoCreator to show these features.
High Quality Guide Video from DemoCreator

One box for everything:
The address bar is also the search box. And it automatically suggests related queries and popular websites based on your input. It is a multifunctional box.
New tab page:
This is not a blank page. It shows us the Links to websites you visit the most, recently closed tabs, and recent bookmarks. It is quite useful for me to find the most visited websites.
Application shortcuts:
This feature enables users to create an easy entry for the special website service.
Dynamic tabs:
For better experience, you can change the tabs position as you want them to be. And Chrome also allows dragging tabs apart, to create separate windows.
Crash control:
If a page breaks in Chrome, it won't take the browser with it, so although you will have to reopen that crashed tab or window, you won't have lost anything else you are doing in other tabs or windows.
Incognito mode:
If you don't want pages you visit to show up in your web history, just choose incognito mode for private browsing. It can protect your privacy.
Safe browsing:
Google Chrome warns you if you're about to visit a suspected phishing, malware or otherwise unsafe website. I was supposed to show you this feature in the demo, but I could not find a sample website like this for a test.
Instant bookmarks:
Chrome simplifies the process of bookmark adding. Just click the star icon at the left edge of the address bar and you have got it done.
Importing settings:
It is easy for you to import your browsing history, saved websites, and passwords from your default browser to Chrome. It reduces the troubles if you switch to Chrome from Firefox or Internet Explorer.
Simpler downloads:
When you download a file from a website, you can your download's status at the bottom of your current window where you can monitor the progress of your downloading file.
There is a new and innovative browser choice for users. Google Chrome does deserve a try. To make some software guide video or website demo, DemoCreator is available.
Google Chrome is a wonderful browser with a simple and clean user interface. It is quite different form IE 8 and FireFox 3. Based on the features of Google Chrome, can it win the browser war in 2009? We will review the special features of Google Chrome. And I have made a demo with DemoCreator to show these features.
High Quality Guide Video from DemoCreator
One box for everything:
The address bar is also the search box. And it automatically suggests related queries and popular websites based on your input. It is a multifunctional box.
New tab page:
This is not a blank page. It shows us the Links to websites you visit the most, recently closed tabs, and recent bookmarks. It is quite useful for me to find the most visited websites.
Application shortcuts:
This feature enables users to create an easy entry for the special website service.
Dynamic tabs:
For better experience, you can change the tabs position as you want them to be. And Chrome also allows dragging tabs apart, to create separate windows.
Crash control:
If a page breaks in Chrome, it won't take the browser with it, so although you will have to reopen that crashed tab or window, you won't have lost anything else you are doing in other tabs or windows.
Incognito mode:
If you don't want pages you visit to show up in your web history, just choose incognito mode for private browsing. It can protect your privacy.
Safe browsing:
Google Chrome warns you if you're about to visit a suspected phishing, malware or otherwise unsafe website. I was supposed to show you this feature in the demo, but I could not find a sample website like this for a test.
Instant bookmarks:
Chrome simplifies the process of bookmark adding. Just click the star icon at the left edge of the address bar and you have got it done.
Importing settings:
It is easy for you to import your browsing history, saved websites, and passwords from your default browser to Chrome. It reduces the troubles if you switch to Chrome from Firefox or Internet Explorer.
Simpler downloads:
When you download a file from a website, you can your download's status at the bottom of your current window where you can monitor the progress of your downloading file.
There is a new and innovative browser choice for users. Google Chrome does deserve a try. To make some software guide video or website demo, DemoCreator is available.
订阅:
博文 (Atom)


